Background
I’m moving to Germany soon to look for a job and wanted a tool to help me improve my German speaking skills. After trying numerous dictionary apps without finding one that met my needs, I decided to build my own solution. My ideal application would accept Chinese voice input or text input, translate it to German, and store the translations in Anki. This workflow would allow me to efficiently memorize vocabulary and practice speaking German.
Reference
While setting up this workflow, I referred to the following video:
I highly recommend watching this excellent tutorial. In this blog post, I’ll focus on the differences and customizations I implemented in my workflow compared to the video.
Workflow Overview
The workflow consists of four main components:
- Input Audio and Text Processing:
- Capture voice or text messages from Telegram.
- Transcribe audio to text.
- Agent Setup:
- Translate text from Chinese to German.
- Generate explanations in Chinese.
- Convert German text to speech.
- Output: Send responses back through Telegram.
- Storage: Save translations to Anki for review.
The workflow configuration file can be downloaded via this link AnkiAssistant.json and imported to your own n8n instance. Screenshots of each part of the workflow are provided below:
-
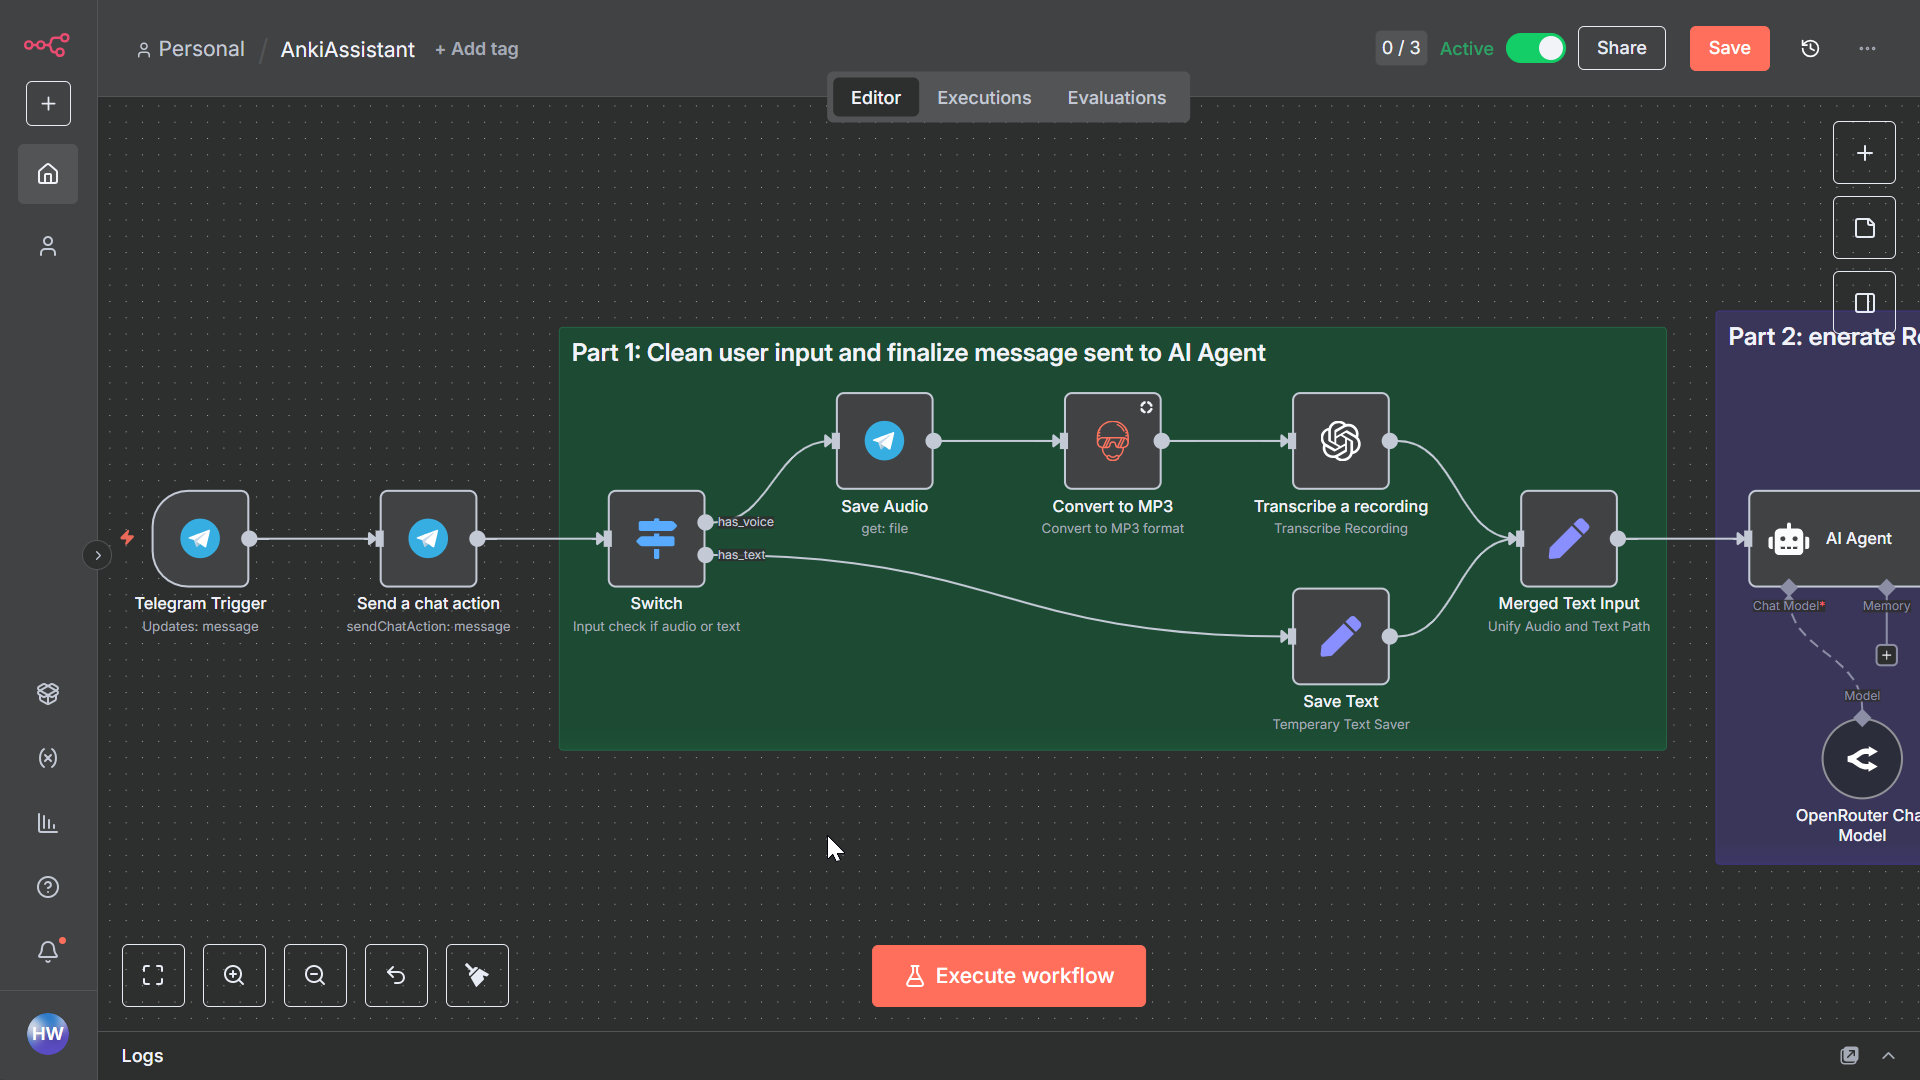
Part 1: Input Audio and Text Processing
-
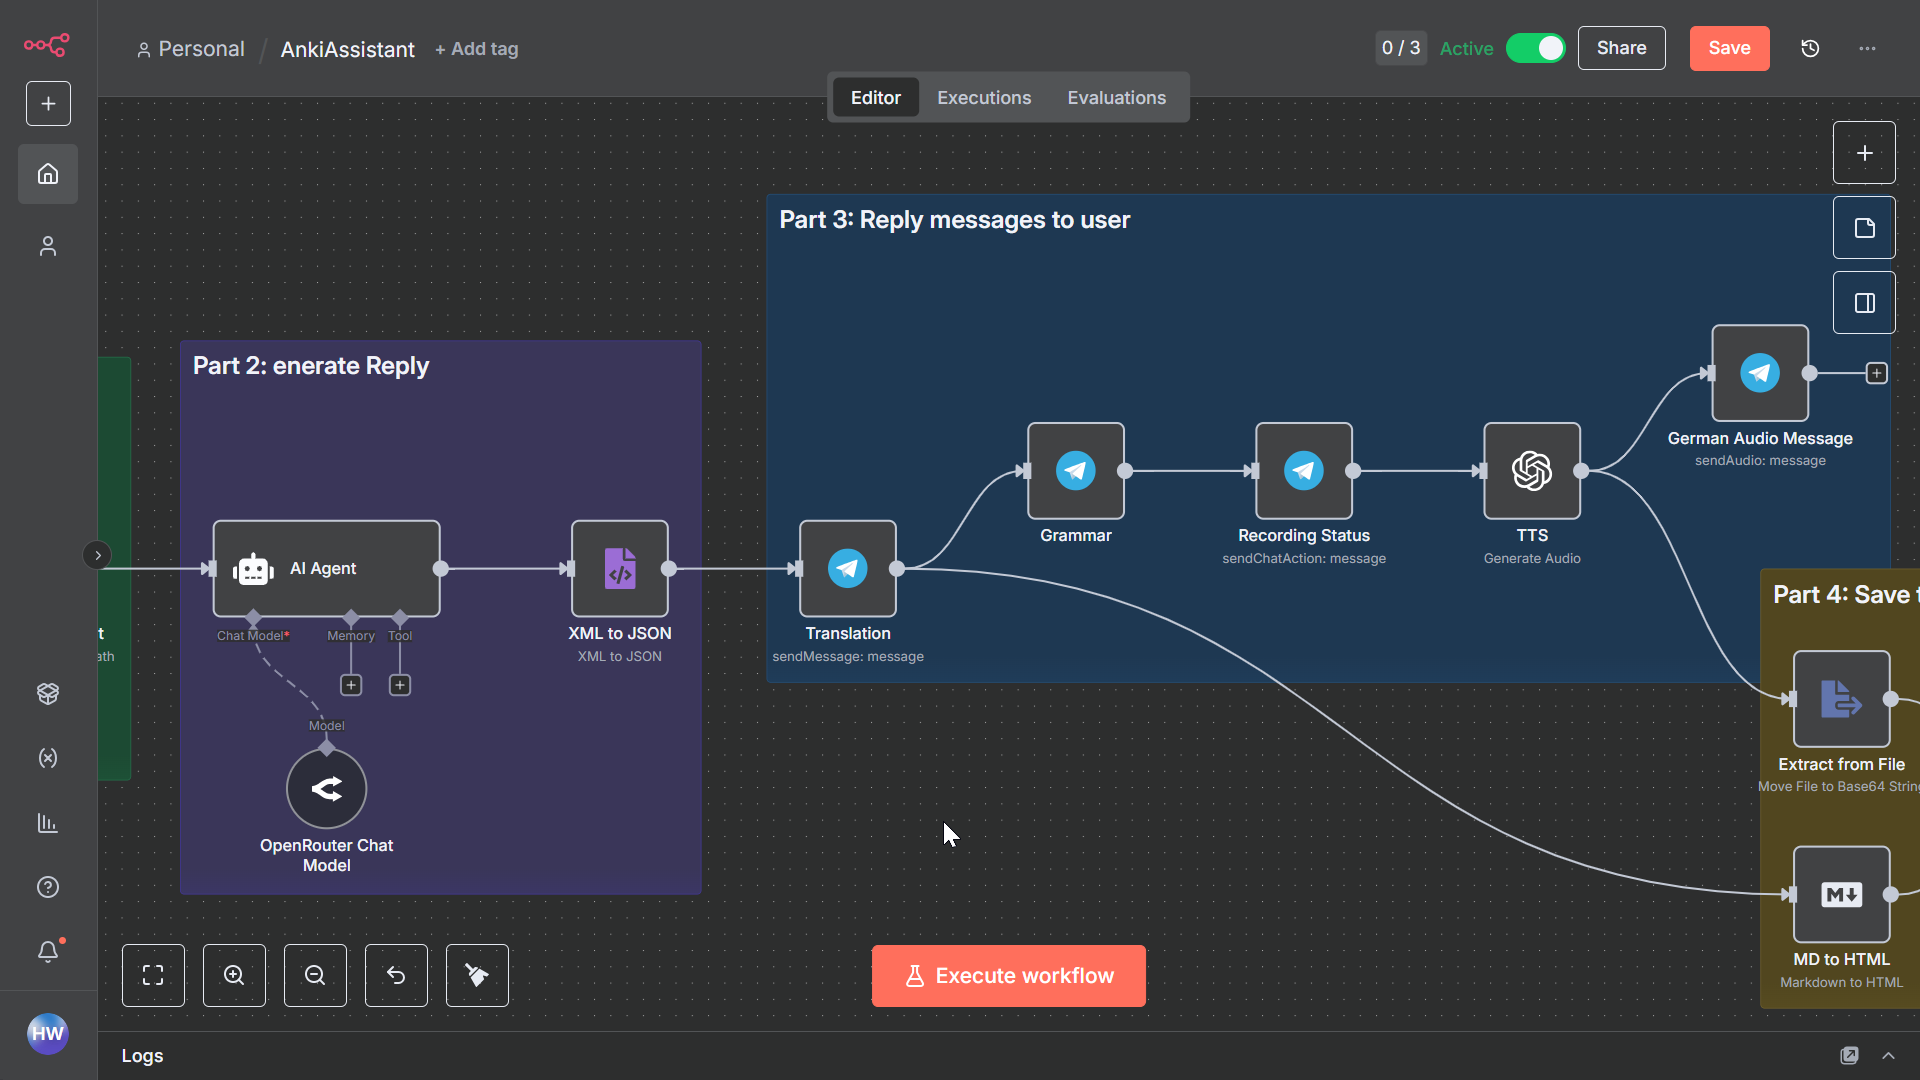
Part 2: Agent Setup and Part 3: Telegram Reply Implementation
-
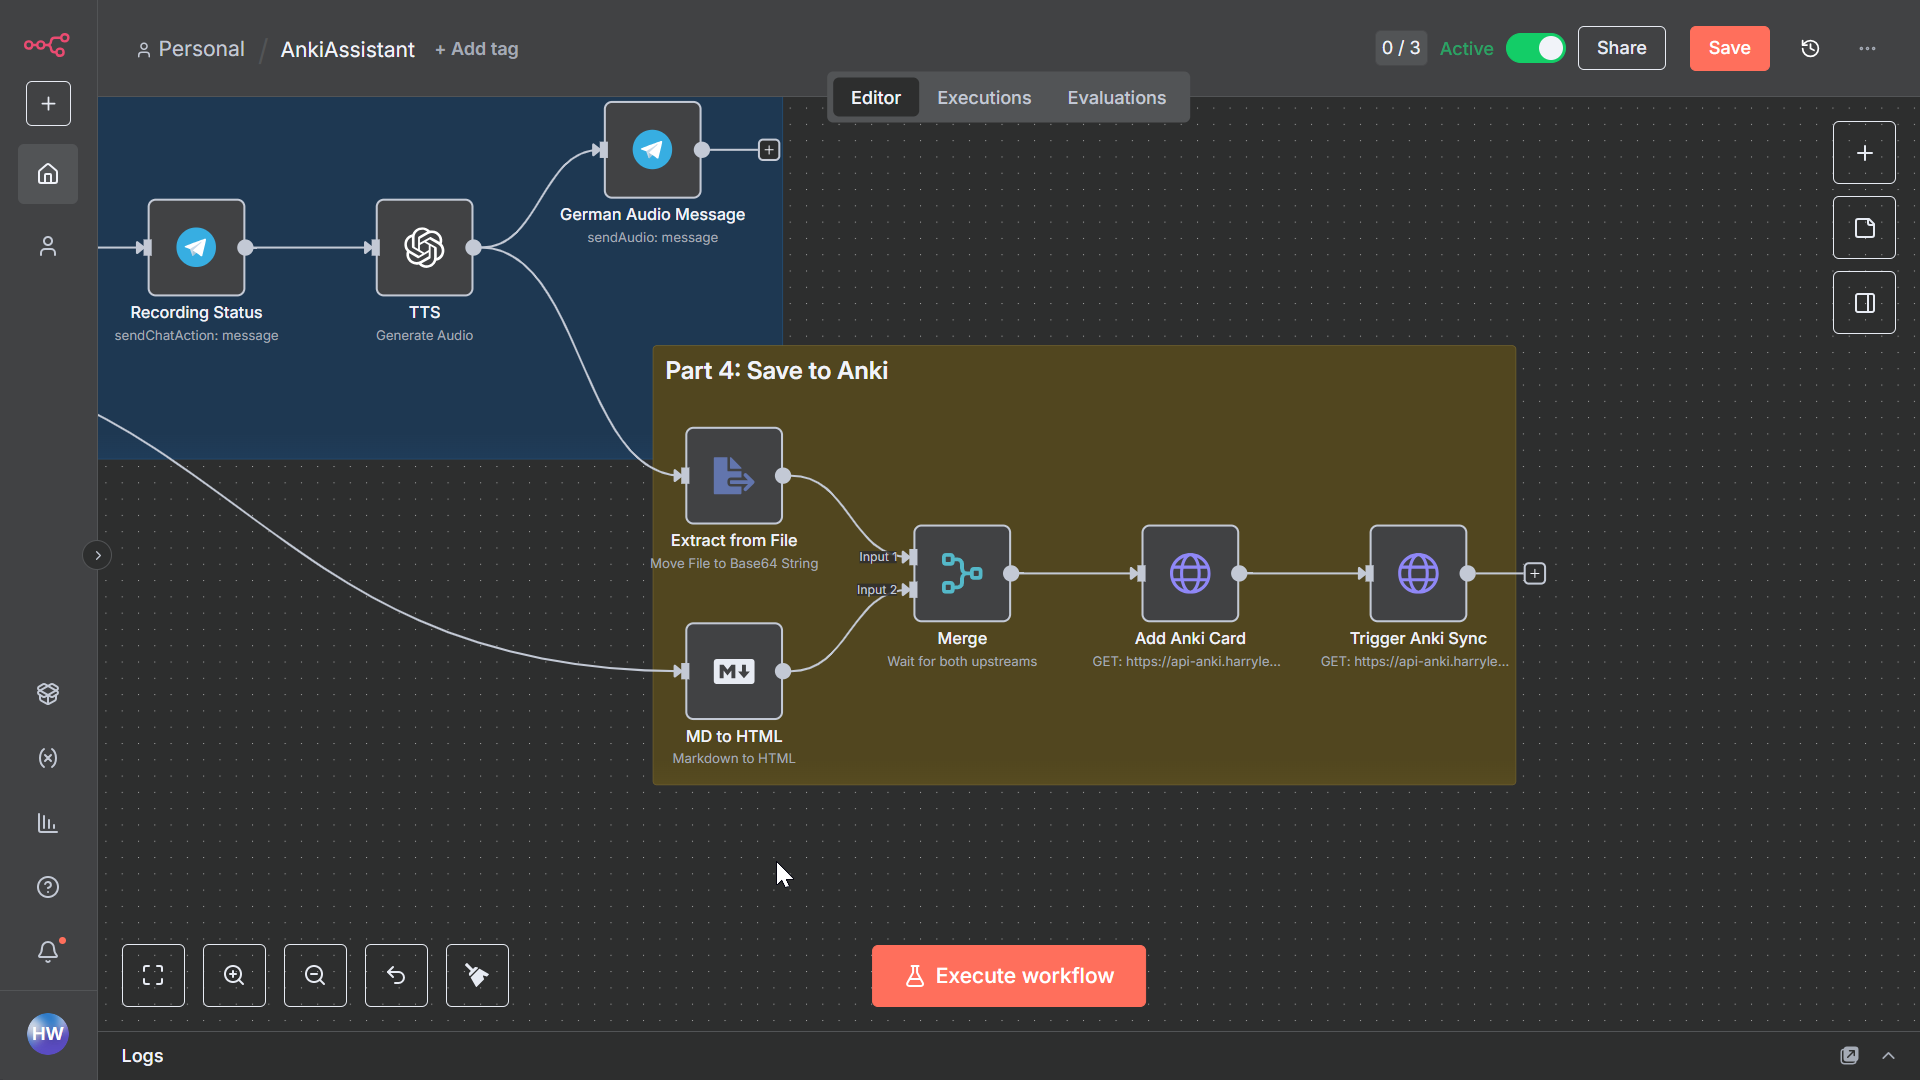
Part 4: Anki Integration Implementation
Infrastructure
All services are self-hosted using Coolify, including:
- n8n (community edition)
- Anki desktop application running in Docker
- Traefik as the reverse proxy (included with Coolify)
System Requirements
Running an Anki docker service is resource-intensive. Based on my docker stats monitoring, the Anki service typically uses around 517MB of memory. For stable operation, I recommend having at least 756MB of free memory available.
CONTAINER ID   NAME                                    CPU %     MEM USAGE / LIMIT     MEM %     NET I/O           BLOCK I/O         PIDS
11e345a80f64   anki-desktop-e4k004csggkkwwo48oo4g8ow   0.48%     517.6MiB / 3.823GiB   13.22%    1.96MB / 1.15MB   196MB / 7.76MB    113
Prerequisites
Before you begin, make sure you have the following:
Accounts & API Keys
- A Telegram account
- A Telegram Bot Token from @BotFather
- An OpenAI API key or compatible LLM service API key
- An AnkiWeb account (for syncing)
Required Software
- Docker and Docker Compose installed
- A server with at least 2GB of RAM (1GB for n8n + 1GB for Anki)
- Coolify installed (or another Docker management solution)
Part 1: Input Implementation
Replacing “If Node” with “Switch Node”
The initial part of my workflow closely follows the reference video, with one key modification: I’ve replaced the “If Node” with a “Switch Node”. This change was necessary because the “If Node” wasn’t correctly passing values to subsequent nodes at the time of implementation, resulting in the following error:
No fields - node executed, but no items were sent on this branch
I’m not alone in encountering this issue, as discussed in this n8n community post. While the “Switch Node” implementation is slightly more complex, it provides reliable value passing between nodes.
Adding an FFMPEG Node for Audio Conversion
When using OpenAI-compatible services, I encountered file format compatibility issues. If you’re using OpenAI’s official service, you can skip this section.
The Problem
Telegram encodes voice messages in OGG or OGA formats. While OpenAI’s API supports these formats, some third-party providers don’t. This incompatibility was causing API call failures in my workflow.
The Solution
I resolved this by adding an FFMPEG node to convert OGG files to MP3 format. Here’s how to implement this solution:
- Build a custom n8n Docker image with FFMPEG installed
- Add and configure an FFMPEG node in your n8n workflow
Building n8n with FFMPEG Support
I prefer using an inline Dockerfile within my docker-compose configuration for simplicity and maintainability. Here’s the docker-compose configuration I use with Coolify:
services:
  n8n:
    build:
      context: .
      dockerfile_inline: |
        FROM n8nio/n8n:latest
        USER root
        RUN apk add --update ffmpeg
        USER node
    environment:
      - SERVICE_FQDN_N8N_5678
      - 'N8N_EDITOR_BASE_URL=${SERVICE_FQDN_N8N}'
      - 'WEBHOOK_URL=${SERVICE_FQDN_N8N}'
      - 'N8N_HOST=${SERVICE_URL_N8N}'
      - 'GENERIC_TIMEZONE=${GENERIC_TIMEZONE:-Europe/Berlin}'
      - 'TZ=${TZ:-Europe/Berlin}'
    volumes:
      - 'n8n-data:/home/node/.n8n'
    healthcheck:
      test:
        - CMD-SHELL
        - 'wget -qO- http://127.0.0.1:5678/'
      interval: 5s
      timeout: 20s
      retries: 10
This configuration creates a custom n8n image with FFMPEG installed, which is essential for audio format conversion.
Configuring the FFMPEG Node in n8n
After setting up the custom n8n image with FFMPEG, you’ll need to add the FFMPEG node to your workflow:
-
Install the n8n-nodes-ffmpeg package from the n8n marketplace
-
Add the FFMPEG node to your workflow
-
Configure it with the following custom command:
-i "{input}" -vf "transpose=1" "{output}"The
transpose=1parameter converts the audio to mono, which is often better suited for voice processing.
Part 2: Audio and Text Processing Implementation
Agent Setup
For the Agent Node configuration, I’ve implemented a structured XML format for prompts, which has proven highly effective. Here’s how I developed the prompt:
- Initial Draft: I started with natural language prompts and tested them in ChatGPT
- Refinement: I then asked ChatGPT to help convert these into a well-structured XML format
- Iteration: After several refinement cycles, the prompt evolved with valuable suggestions from ChatGPT
Since n8n primarily uses JSON for data handling, I added an XML Node after the Agent Node to ensure proper data format conversion and processing.
Part 3: Telegram Reply Implementation
Setting Up Message Responses
The workflow following the Agent Node handles application-specific functionality. In my implementation, this includes:
-
Message Delivery:
- Sending German translations and Chinese explanations to the user
- Delivering an audio version of the German translation using TTS
-
User Experience Flow:
- Translations and explanations are sent as separate messages for better readability
- A “Recording” status message is sent before TTS processing begins, setting user expectations
-
Data Persistence:
- All translations are saved to Anki via its API for future review
Note: The Anki setup details are covered in the following section, as they involve infrastructure configuration rather than n8n workflow setup.
Part 4: Anki Integration Implementation
Overview of Setting Up Anki with API Access
To integrate Anki with your workflow, follow these steps:
-
Dockerized Anki Desktop:
- Run the Anki desktop application in a Docker container
- Access the GUI client through VNC
-
Anki-connect Plugin:
- Install the Anki-connect plugin to enable API access
- This provides endpoints for programmatic interaction with Anki’s data and interface
-
Security:
- Implement basic authentication to secure your Anki services
Docker Configuration for Anki
Here’s the docker-compose configuration I use to run Anki in Coolify. The Traefik labels are simplified thanks to Coolify’s built-in functionality. Basic authentication is configured through the labels section, which Coolify automatically processes and applies to the service’s middlewares.
services:
  anki-desktop:
    image: 'mlcivilengineer/anki-desktop-docker:main'
    environment:
      - PUID=1000
      - PGID=1000
    volumes:
      - './anki_data:/config'
    expose:
      - '3000'  # VNC port
      - '8765'  # Anki-connect port
    labels:
      # Basic authentication configuration
      - 'traefik.http.middlewares.anki.basicauth.users=${AUTH_USER}:${HT_AUTH_PWD}'
Note: If you’re not using Coolify, you’ll need to manually configure Traefik or your reverse proxy.
Port Configuration
- Port 3000: VNC access to the Anki desktop interface
- Port 8765: Anki-connect API endpoint
In Coolify, map these to your domains like this:
https://anki.harrylearns.com:3000,https://api-anki.harrylearns.com:8765

Coolify will automatically route traffic to the appropriate ports based on the domain names.
Final Setup Steps
To complete your Anki setup:
-
Install Anki-connect:
- Open the Anki desktop interface via VNC
- Install the Anki-connect plugin through Anki’s add-on manager
-
Sync with AnkiWeb:
- Log in to your AnkiWeb account within the desktop client
- This enables synchronization of your cards across devices
-
Restart the Container:
- After installing Anki-connect, restart the container to ensure all components are properly initialized
- The Anki-connect service will start automatically with the container
Summary
In this blog post, I’ve outlined the process of building a Telegram bot using n8n that can translate Chinese to German and store the translations in Anki. The workflow is designed to be simple and easy to use, with clear instructions for each step. I hope this blog post will be helpful to others who are looking to build similar applications.